Monday, July 30, 2012

DIY inspiration : Ear cuffs


ear cuff, jewelry
ear cuff, jewelry
this is an "old school" ear cuff to me, this style was popular even few years ago
ear cuff, jewelry
this is a new school one: statement, bold exagerated ear cuff -  pics via supermeow's wonderland
ear cuff, jewelry
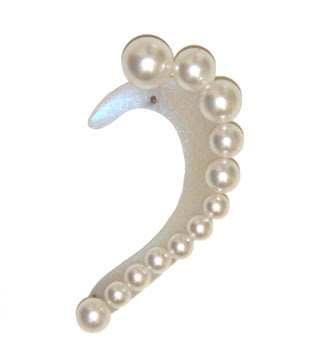
pearl ear cuff via Vogue
ear cuff, jewelry
ear cuff, jewelry
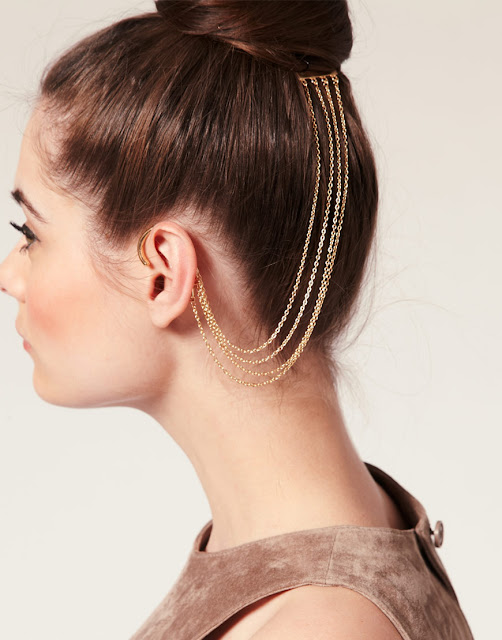
multiple chains hanging from the ear, that would be a super fast DIY - I think charms with crosses are very in right now
ear cuff, jewelry
a hook + a chain + a comb = rad diy- pic via Asos
New ways to adorn your ears and just one rule: pull your hair up and show your style Here's a few inspirational images I collected to inspire you to make your own DIY ear cuff.

Friday, July 27, 2012

Refeshion your house: 7 home decoration ideas inspired by fashion

what a curious way to reclycle a shoe: succulent stiletto planters by  GiddySpinster on Etsy

Simple statement piece : the shoe maker lamp by junktion
recycled  clothing seat by Tobias Juretzek
No one will figure out what this rug is made of:  recycled tees rug tutorial via Molly K. Stoltz
what a nice way to show clothes: necklace cloth hanger via manmakehome  

I'm not sure if it's comfortable or not but it will grab atten tion for sure Coat hanger chair by Style My Life
shoe lamp via core77

Our favorite fashion pieces get out of the wardrobe and take over the house. Here are 7 ideas to transform your clothes or fashion accessories into new pieces of furniture!

Tuesday, July 24, 2012

Discover the DIYer secret weapon and make a pair of studded earrings


Learn how to turn some harmless pearls into these spiky mines.
Firstly I'll give you a good excuse to buy new nail polish. From now on we are not only using them to paint our nails but also as a diy secret weapon. New shades for nails are out very often. There are almost an infinite variety of colours, some very sophisticated, chromed or iridesents, with glitters. The vast majority of nail polishes are inexpensive and sold in small sized bottles, perfect for your diy projects. Shortly nail polish can be a good alternative to paint sometimes: it's cheaper and you can buy it almost everywhere. Let's face it: we'll always have more bottles of nail varnish than cans of paint.
In addiction I'll show you a little trick to keep rounded surfaces from rolling while you paint them. 

Oggi vi mostrerò come trasformare delle innocue perle in un paio di orecchini decisamente aggressivi.
Ma prima vorrei fornirvi una buona scusa per comprare altri smalti per le unghie. Anche se pensati per decorare le nostre unghie, a volte gli smalti possono essere una furba alternativa alla vernice. Pensateci: esistono in mille colori diversi, alcuni molto sofisticati, cangianti o pieni di glitter; sono venduti in piccole dosi, perfette per i vostri progetti fai da te e spesso sono economici. E poi ammettiamolo: avremo sempre più bottigliette di smalto in casa che lattine di vernice. 
In più vi mostrerò un piccolo trucco per impedire alle superfici tonde di rotolare mentre le dipingete.


You'll need:
nail polish
2 pearls
chain
2 earring hooks 
glue gun
glue
metallic wire 
pliers

avrete bisogno di:
smalti
2 perle
una catenella
2 ganci per gli orecchini
colla a caldo
colla
filo metallico
pinze

Plastic pieces from cocktail forks, previosly used to make crystal earrings

 ho usato delle punte in plastica ricavate da delle forchette da cocktail che precedentemente avevo usato per realizzare degli orecchini trasparenti

To keep pearls and other stuff from rolling while you're painting them you can temporarily glue them on a piece of paper using the glue gun

Per evitare che le superfici tonde rotolino mentre le dipingete potete incollarle temporanemente su un pezzetto di carta con della colla a caldo

Your sparkly nail polish will make these pearls shine
Il vostro smalto glitterato farà risplendere le perle
 
Good pearls gone bad: Paint the plastic forks pieces with black nail polish and then glue them onto the pearls

Stendete lo smalto nero sulle punte e poi incollatele sulla perla


Once everything is dry insert the metallic wire into the pearl and make a loop with pliers. Connect the spiky pearl to a piece of chain. Add a earring hook and you've done.

Quando la colla sarà asciutta  inserite nella perla il filo metallico e realizzate un gancetto. Collegate la vostra "mina" ad un pezzetto di catenella e la catenella ad un gancio per gli orecchini.

Saturday, July 21, 2012

How to wear a men's jacket

rihanna, blazer dress, stella McCartney
Rihanna in Stella McCartney
miley cyrus billboard awards, blazer dress, jean paul gaultier
Miley Cyrus in Jean Paul Gaultier
 Women like to mix masculine and feminine clothes to obtain unexpected looks. A characteristic  men garment like the blazer can be transformed in a very sexy and feminine mini dress. In order to get this look we have to balance the masculine jacket with feminine details so don't forget to wear high heels. We can DIY a dress similar to the one Miley Cyrus is wearing starting from an oversized blazer or a man jacket. While looking for the perfect jacket to customize pay attention to the lenght (that must be similar to a dress lenght) and the width of the shoulders. If the shoulders are too wide we can cut off the sleeves and sew a new armhole.

 Sempre più spesso le donne si  divertono a mescolare elementi maschili e femminili per ottenere dei look inaspettati. E così la giacca sartoriale, caposaldo del guardaroba maschile può diventare un sensuale ed impertinente mini dress. Attenzione però, è necessario controbilanciare i dettagli maschili con altri iperfemminili quindi gambe in primo piano e tacchi alti. Potete partire proprio da una oversize per realizzare un vestito simile a quello di Miley Cyrus. Nella ricerca della giacca perfetta da trasformare prestate attenzione alla lunghezza (che deve essere simile a quella di un vestito) e all'ampiezza delle spalle. Se quest'ultime dovessero essere troppo larghe potrete modificarle rimuovendo le maniche e ridefinendo il giromanica.

Wednesday, July 18, 2012

How to sew a pair of pants : step by step guide revealed

how to, sewing project, pattern free project
DIY trousers - cut out asymmetric DIY shoes
Here's my newest sewing project and my new favorite pair of trousers. I like the strong contrast between the colors! I used black and white cotton of a similar weight. Want to make a pair like these? You have a few options
  1. Quick fix:Mix two pants find 2 pair of trousers in your closet with two colors that you would like to match (or find two discounted at sales even starting from $12); rip the seams, mix the front of one with the back of the other  and sew it back!
  2. Make yourself the pattern: take a pair of old trousers that fit you well and sacrifice them for the sake of fashion (just kidding!), rip the seams we'll use them as a pattern. You'll need the front and the back of one leg (front and back are different for good fit!). 
  3. Buy the pattern You can buy pant patterns with standard sizes online or find them on magazines. Burda magazine for example is a good resource.
 Now that you picked your option here's a few instructions on how to make a pair of pants

  1. Cut the fabric Double your white cotton fabric and cut along the shape of your front pattern; (leave some space for the seams) do the same with black cotton and the back of the of your patten. Now you should have 4 pieces 2 fronts and 2 backs.
  2.  Let's put the trousers together
  3. Sew each leg separately; put the front on the back and sew the inside seam and the outside seam of the leg
  4. Match the two legs together. Put one leg inside out and then insert the other leg (facing straight) in it. Sew the crotch seam from the front to the back
  5. Pants are almost done, did you remember to leave some space for a side zipper? If not open the left lateral seam for 10 cm or more and sew the the zipper in place.
  6. Adjust the lenght of the leg and finish your trousers with a hem at the bottom.

Sono l'ultimo paio di pantaloni che ho realizzato ma sono diventati rapidamente i miei preferiti. Penso che l'accostamento del bianco con il nero li renda una variante altrettanto versatile del pantalone nero . Ho utilizzato due stoffe in cotone dal peso simile. E voi avete mai realizzato un paio di pantaloni? Se volete realizzarne un paio simili a questi avete diverse opzioni:
  1. Barate  (scherzo!)  l'idea furba è quella di selezionatre 2 paia di pantaloni nel vostro armadio (o compratene due paia uguali di colori diversi ai saldi anche a  partire da 10 euro) scucirli e mischiare il davanti con il dietro e ricucirli
  2. Fate da sole il modello del pantalone Trovate un pantalone nell'armadio che vi calza a pennello (ma neanche troppo nuovo) e sacrificatelo in nome della moda! (esagerata!). Scucitelo e usatelo come modello  per un nuovo pantalone. Vi servirà il davanti e il dietro di una gamba (attenzione davanti e dietro sono sempre diversi per assicurare la giusta vestibilità).
  3. Comprate il modello Andate in edicola ed acquistate una rivista con i cartamodelli, Burda è un ottima scelta.
Ora che che avete il modello vi chiederete, ma come si cuciono i pantaloni?

  1. Tagliate la stoffa Piegate a  metà il cotone bianco (in questo caso) e stendeteci sopra il modello del davanti. Tagliate seguendo la forma lasciando dello spazio per effettuare la cucitura. Fate lo stesso con il cotone nero. Alla fine dovreste avere 4 pezzi: 2 davanti e 2 dietro
  2. Cuciamo il pantalone!
  3. Cucite ogni gamba separatamente: mettete il davanti sul dietro e cucite la cucitura esterna  e quella interna (dal cavallo fino in fondo)
  4. Mettete una gamba a rovescio e infilateci dentro l'altra gamba (a dritto). Ora la cucitura del cavallo combacia; cucite dal davanti fino al dietro.
  5. I pantaloni sono quasi finiti: scucite di circa dieci centimetri la cucitura laterale a sinistra e cuciteci una zip
  6. Terminate orlando i pantaloni.

Friday, July 13, 2012

Cut out shirts: more skin less fabric

sheer shirt, cut out shirt
streetSFN
sheer shirt, cut out shirt
I particularly like this one via fashion gone rogue
sheer shirt, cut out shirt
Givenchy via shampalove

sheer shirt, cut out shirt

sheer shirt, cut out shirt

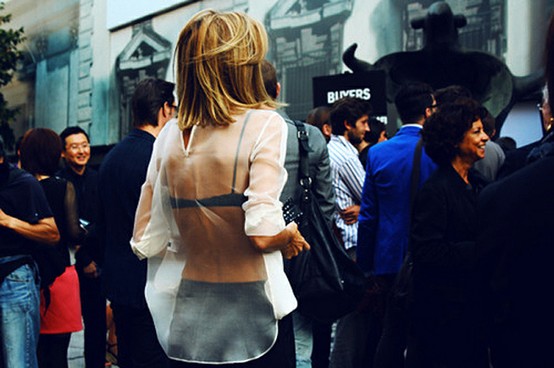
DIY inspiration to survive this hot summer staying stylish.
  • cut out fabric from your shirts (it can be sleeves, the bottom, the back)
  • use the cut piece as a pattern and copy its shape on a lightweighed fabric
  • sew the sheer fabric in place
to get a unique sheer shirt.

I cut out a man shirt once and I'm definitely going to use this technique again to make a summer sheer shirt.

Ecco qualche spunto per sopravvivere a questa calda estate con stile. 
Possiamo alleggerire una camicetta estiva in questo modo:
  • ritagliate delle parti dalla camicetta (possono essere le maniche, il retro o parte del davanti) 
  • utilizzate la parte tagliata come modello e ricopiatene la forma su una stoffa leggera e trasparente
  • ricucite il pezzo mancante
  •  otterrete così una camicia davvero unica e fresca
Ho applicato questa tecnica con successo per trasformare una camicia da uomo, cliccate qui per guardare il tutorial

Wednesday, July 11, 2012

How to turn a scarf into a skirt in less than 1 hour

1 hour skirt, DIY, easy skirt tutorial, how to transform a scarf, how to turn a scarf into a skirt no pattern, scarf skirt diy, skirt diy, skirt pattern, tutorial,
scarf skirt DIY
1 hour skirt, DIY, easy skirt tutorial, how to transform a scarf, how to turn a scarf into a skirt, MY DIY, no pattern, scarf skirt diy, skirt diy, skirt pattern, tutorial,
scarf skirt tutorial
Today I would like to show you how to transform a scarf into a fun summer skirt in less than an hour (see also how to transform a scarf into a dress).
Scarfs come in a variety of colors and prints (I got this one at H&M and it's approximately 90x90 cms) and can be worn around the head as a turban or around the waist as a belt but from now on they can be your favorite silk skirt.


Oggi vi mostrerò come trasformare un foulard in una gonna in meno di un'ora (vedi anche come trasformare un foulard in un vestito). Troverete in commercio foulard dalle fantasie più varie e colorate che diventeranno una stoffa unica per realizzare la vostra nuova gonna in seta (il foulard in alto è di H&M circa 90x90cm). Cliccate qui per guardare il tutorial completo.

Sunday, July 8, 2012

Floating claw ring DIY


punk ring, floating ring, fashion diy, ring diy

I trasformed these chili pepper beads (I bought them in a chain similar to this one) into claws to make  a floating punk ring.  It wraps around a finger and sits between two. I used a chrome spray paint to color them and I'm positively surprised by how they shine! If you want to make one similar here's how to do it.

Ho trasformato queste perline a forma di peperoncino in artigli utilizzando della vernice spray cromata e li ho utilizzati per realizzare un un anello punk che decora lo spazio tra due dita. Ecco come realizzarne uno simile:
  • Con l'aiuto delle pinze curvate il filo metallico intorno alla prima perlina
  • curvate il filo per realizzare la forma dell'anello
  • aggangiate con il filo anche la seconda perlina e bloccatelo
  • ultimate l'anello spruzzandolo di vernice spray cromata


 You'll need: chilli pepper beads, pliers, metallic wire, chrome spray paint
Wrap the wire around the first bead
Make a ring shape and wrap the wire around the second bead
Once done spray paint the ring with silver chrome paint


Friday, July 6, 2012

5 summer nail trends you need to try

louboutin nails
by pshiiit.com
caviar manicure
Caviar manicure - inexpensive version with cupcake sprinkles and lots of top coat via pinterest
nail ring
Nail ring
metallic nail tip
metallic tips via pinterest
shaded nails, ombre nails, gradient nails
shaded nails - Diy tutorial here
The shaded nail manicure has been for a long time my favorite. It's perfect for summer and it can be done in any color. I'm impatient to try the other manicures!

Wednesday, July 4, 2012

Almost barefoot


barefoot sandals
by LotusRootsCreations

barefoot sandals
by barefootgypsies

 With a little creativity you can dress your feet even on the beach.
These so colled barefoot sandals are something between a sandal and a anklet.
If you don't plan to walk on the sand barefoot these is also a quick idea to decorate a pair of shoes you already have.
Make your barefoot sandals with these easy steps.
  • Take a trim (or make one with crochet)
  • make a loop in the middle  (this is where you insert the finger)
  • Get creative: attach a brooch or a pendant to it (or a flower), add beads
  • leave the trim long enought to be able to wrap it around the ankle twice 
  • and you've done! Now be the most stylish of the beach!

L'estate ormai è a pieno regime ed è ora di sfilarsi le scarpe per passeggiare a piedi nudi sulla sabbia. Per coloro che assolutamente non possono fare a meno di vestire i piedi anche d'estate ecco un'idea carina per rendere stilosa anche una passeggiata sul lungo mare.
A metà tra un infradito e una cavigliera queste decorazioni sono veloci da realizzare e possono essere una buona idea per rendere diverse anche un paio di scarpe che già abbiamo.

Per realizzare i vostri sandali:
  • Prendete una trina
  • create una cappiolina al centro (dove inserirete il dito)
  • Siate creative fissateci una spilla o un fiore
  • lasciate abbastanza trina per poter fare due o più giri intorno alla caviglia

Sunday, July 1, 2012

Build your arm party: How to make istant macrame bracelets

how to, arm party, arm party diy, bracelet diy, summer bracelet, macrame bracelet diy, diy, my diy, bracelet diy, trim bracelet

These trims were just too cute to seat in a box. They can be quickly transformed into summer macrame bracelets and make a nice arm party ( to stack your arms with bracelets see also this arm party  tutorial!).
All you have to do is
  • choose any trim you like
  • cut them the size of your wrist
  • add a fastening
  • and you've done
Speaking of fastenings you have more than one option. You can glue (or sew) a snap button on the trim or you can make a small decorative fastening with just a bead and thread. I'll show you how.

Date un'occhiata agli scaffali della merceria. Troverete tante trine di ogni tipo che possono essere trasformate velocemente in deliziozi braccialetti macramè
  • misurate il vostro polso
  • tagliate le trine della lunghezza giusta
  • aggiungete una chiusura e il braccialetto è pronto.
Per chiudere i braccialetti basterà un bottone automatico cucito o incollato all'estremità della trina. Oggi vi farò vedere come realizzare velocemente una chiusura decorativa usando solo del filo e una perlina.
D'estate le braccia sono in primo piano quindi non dimenticate di vestirle con gli accessori. Più sono i braccialetti meglio è. Imparate a farne altri cliccando qui.

Create a few loops with thread - Fate passare il filo più volte nella trina
then make simple knots around those loops you'll create a button hole - Poi fate dei semplici nodi attorno al filo
on the other side insert a bead and knot the thread - Dall'altro lato inserite una perlina e annodate il filo
Insert the bead inside the loop and the fastening is done. - La perlina entra nell'asola e crea una semplice chiusura
White trims can be painted with acrylic colors - Divertitevi a tingere le trine bianche con i colori acrilici
here's how  fastenings look once finished. Nice and decorative. - Ecco come appaiono le chiusure allacciate