
 |
| Rewritable chalkboard bunting with Cat Morley |
Today Cat Morley will show us how to make a rewritable chalkboard bunting. I'm really tempted to try this project the next time I throw a party. You do it once and you can use it over and over. You can make it a "happy new year" bunting or a "Happy Birthday bunting". If you're dating two guys you can write "Happy Birthday John" and then the following month write "Happy Birthday Jack", in this case just make sure both guys have the same name lenght...just kidding. You'll find the tutorial in the slideshow below. It goes on by itself but you can also click on the dots below the pics to highlight a specific step.
Cat Morley, along with her boyfriend Tom, is the founder of Cut Out+keep the crafty community in which anyone can share their step by step tutorials. She also joined us in Pick your DIY making an awesome bow clutch.
If you want to learn more about Cut out+keep and admire Cat and Tom's super organized office and enviable color coded library, watch the video they made with and for Google, they are the stars of Google lasted advert!
-
 Chalkboard bunting by Cat Morley
-
 Detail
-
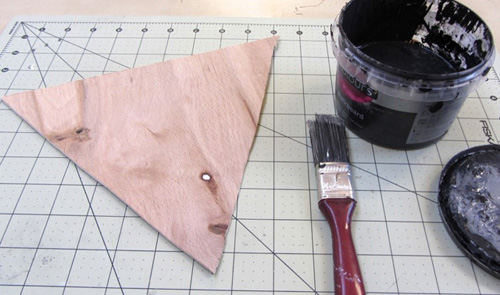 Start by cutting triangles out of thin wood. We used some scrap shipping wood that came as packaging with a piece of furniture. You can buy wood triangles in craft shops, if you struggle to find a piece that works well. You'll need about 12 triangles to be able to write a nice long message.
-
 Paint your triangles with a coat of chalkboard paint and leave to dry.
-
 Paint with a second coat of paint and leave to dry again.
-
 Punch a hole at either side of the top of the triangle. My wood was thin enough to use a hole punch
-
 Loop some string through the hole
-
 Secure at the back with a knot and then string through the second hole, securing with another knot.
-
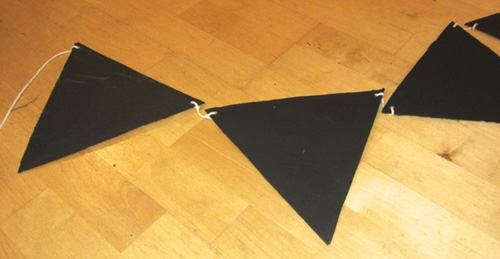 Leave a small length of string between each triangle and continue threading them all on to the string
-
 Now the fun part. Write on your bunting with chalk. I used a ruler to give mine a neat outline, but you can decorate yours however you like!
-
 Chalkboard bunting by Cat Morley
5 comments:
This is so awesome! I love the idea of chalkboard anything! Thanks for introducing us to Cut out and keep as well, I can't get enough DIY ;-)
♥ Paula Shoe Fiend.
http://shoe-fiend.blogspot.co.uk/
Cute idea :)
xx
www.clothesandcamera.com
I like this post alot
Hair Cut in Long Hair
Great idea! I love your blog, so inspiring!
Much love,
Wengie
www.wengie.com"
"Loved this blog post <3
Post a Comment